
Technical Resources for the Study of Biblical (Koine) Greek
Having just completed my first year of Koine Greek language training in Seminary, I though I would share some of the resources I used, and some I personally developed, while learning Biblical Greek. In no sense are these resources comprehensive, nor could you even begin to learn Greek through only the use of what is posted here. My goal is to supplement formal training with some helpful tools, tips and tricks.
If you too have studied Koine Greek and have tools you have found useful (which careful sensitivity to copyright laws will permit you to post), please share them in the comments section below!
Versions of the Greek New Testament (GNT)

I learned about two primary editions of the GNT: the Greek New Testament (4th edition, commonly referred to as UBS4) and the Nestle-Aland (28th edition, or NA28). I own the large print version of the NA28 (see links in resources below).
What’s the difference?
The texts very similar. The prefix of each edition claims similarity between the two. They were produced by the same people, with the same scholarship. However, there are minor differences, specifically around punctuation, capitalization, accenting, formatting, and the like. Many say that (in print) they are intended for different purposes — the NA28 for scholars, and the UBS4 for translators. I’m not sure I know what that means; seems to me like translation is a very scholarly activity, and that whatever you would need for one, you’d need for the other. Besides, “being scholarly” isn’t a very well-defined purpose for anything.
At any rate, there are essentially two primary differences between these two editions:
- The minor differences in the text “decoration” (my term), as I stated.
- The critical apparatus differs significantly between them.
- NA28 contains a very densely-packed robust textual / critical apparatus (showing textual variations among the many source manuscripts from which the GNT was established), focusing on exposure to alternate readings of the text (even listing extrabiblical textual and other ancient langage witnesses)
- UBS4 has, in actuality, two different apparatuses — a textual / critical apparatus focused more on giving a lot of information about a few major variations, and a “discourse segmentation” (i.e., punctuation) apparatus, plus a cross-referencing system
If you want broad exposure to even obscure things, use the NA28. If you want to go deeper closer to the center, (or on punctuation), use the UBS4.
 Either way, you will also want to make use of a good Interlinear Bible. This is a version of Scripture that links each word in the Greek or Hebrew text to one of more lexicons (such as Strong’s or Thayer’s) to give you the meaning, pronunciation, part of speech, etc. for that word. I use the BibleHub online version because it’s free and gives me exactly the information I want and need easily. It’s a little cumbersome to navigate, but if you’re like me, then once you figure out the URL scheme (which is pretty straightforward), you’ll likely jump straight to where you want to be and only use the site navigation to go forward / backward a verse or two.
NA28 Critical Apparatus
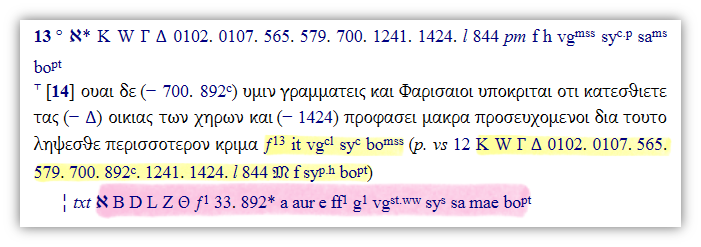
The first thing you need in maximizing the value of the NA28 is to understand its critical apparatus. To that end, I found this document, made available to the public by Marquette University, to be very helpful:![]()
http://www.marquette.edu/maqom/ApparatusGuide.pdf
Then, once I started writing exegetical papers, I needed to be able to insert icons matching the various shorthand symbols found in the NA28. This proved to be way more complicated on my Mac than I thought it would be. Much easier on the PC. It boils down to adding unicode characters to your document (which sounds easy, but there are some interesting twists along the way). I’ll handle the mechanics of how to do it below in the Mac- and PC-specific sections. But there is a well-done list of the hex unicode values you’ll need on the Evangelical Textual Criticism blog. For example, you can see that I have easily created a number of helpful graphical sigla:
- text ⸂ text replaced by some witnesses ⸃ text
- sometimes one ° word is omitted
- References to key manuscripts, such as ℵ or 𝔐 or 𝔓 (you’ll use a better than this)
- Etc.
See the sections below on “Adding Hex Unicode” for more information on the mechanics of how to use these.
Lastly, I’ve found it helpful to have a handy list of all the manuscripts referenced in the critical apparatus. Normally, I’m pretty shy about treating Wikipedia as an academic reference, but they have some really great pages that list sets of manuscripts: Lists of NT uncials, minuscules (landing page ‘cuz there are thousands), papyri, lectionaries
Using Greek on the Mac
Speaking of writing papers, the need to be able to type in Greek and easily switch back and forth between Greek and English is paramount. I’m a Mac user, so I can’t speak to a PC-based setup. Hopefully, you’ll find these tips and tricks helpful.
MacOSX
(At the time of this writing, I’m using OS X Yosemite [v10.10].)
Font: I am still deciding between two font families…
I started out with the Gentium Font Family for Greek in Word and other contexts on the Mac. Download the font (either from sil.org or from my site), then install as follows:
- Unzip the downloaded zip file
- Add the two TTF files to your font manager
- If you had a Word document (or equivalent) open trying to read this font prior to installing it, make sure you close Word entirely — on the Mac, it’s not enough to close and reopen the doc; you must close the whole app (⌘-Q, not ⌘-W)
- Re-open the document
- And you should see the Greek text.
Once I started Hebrew, I discovered the fonts from the Society of Biblical Literature. There are three fonts out there: Greek, Hebrew, and a BibLit font, which attempts a hybrid font that “combines Greek, Hebrew, and Latin characters, including transliteration diacritics.” Installation procedure would be identical.
Add Greek Keyboard: To create my own Greek text on the Mac, I added the “Greek Polytonic” input source from keyboard settings. I do NOT recommend the “Greek” source, because it doesn’t support accent, breathing or other marks as effectively (in my opinion) as does the Greek Polytonic keyboard.
First, add the input source:

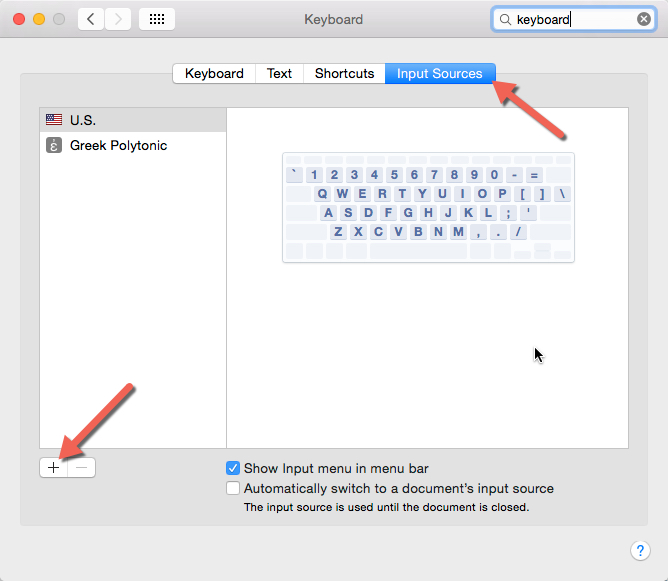
Once the input source is added, you will see it in the menu bar…

And you can setup a shortcut (also in keyboard settings; see the image to the right above; select the “Shortcuts” tab — which allows you to switch quickly back and forth between your native keyboard and your new Greek Keyboard, using a hotkey. I set mine to ⌘-[ (to scroll left) and ⌘-] (to scroll right) between the options. Note that if you select something that already exists as a hot-key, you’ll have to remove that hot-key from the old shortcut. Obviously, any given key combination can only link to one thing.
Adding Hex Unicode: TODO
Using the Character Viewer: TODO
Microsoft Word
(At the time of this writing, I’m using Word v15.)
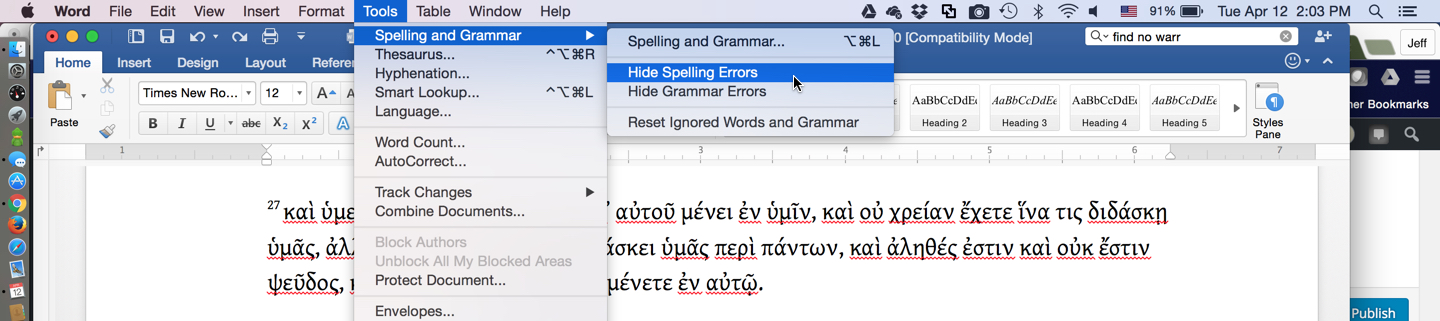
Hide Spelling Errors: Word helpfully underlines all your lovely Greek text with red squiggly lines indicating that it is an incorrectly spelled English word. That’s pretty annoying. The good news is that you can easily turn this off. Select “Tools” in the menu (NOT the ribbon, the menu), then “Spelling and Grammar” (first item), then check “Hide Spelling Errors”. This will only work for the current document, but it will send the unhelpful red squiggles out where there is weeping and gnashing of teeth.
Make sure you’re using the right language: In the status bar at the bottom of the app, from the left, Word shows you: page number, word count, the spiffy dictionary icon, and then the language Word thinks you’re using. I’ve noticed that if you switch back and forth between Greek and English, then this indicator can get confused. The way this always seems to reveal itself is with red squiggly lines 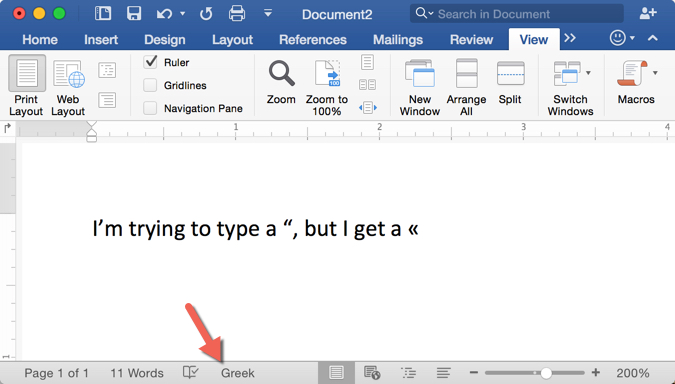 under correctly-spelled words (see about), but also when I type a double quote (“), I get a funky double arrow character (« or »). If this happens, look at the language indicator for that part of the text, and it will likely show “Greek” when you’re trying to work in English. Just change it (click on “Greek” in the bottom bar, and select “English (US)”, then retype your quote mark.
Using Greek on the PC
TODO
Adding Hex Unicode to Word: Especially in Microsoft Word, this is the easiest thing ever. Simply type the unicode for the symbol you want, highlight that text, and hit ALT-X. So, for example, to display the majority text symbol, type the letters “ID510” (no quotes) into Word, highlight, press ALT-X, and Word will convert it to “𝔐” in whatever font is active. Pretty nifty! There is also a “special character input” screen, as there is with Mac, and I’ll come back to describe it in more detail. But this is an extremely simple baseline to get you started. I just wish Word for Mac had an equivalent.
TODO: More to come.
Structural Diagramming
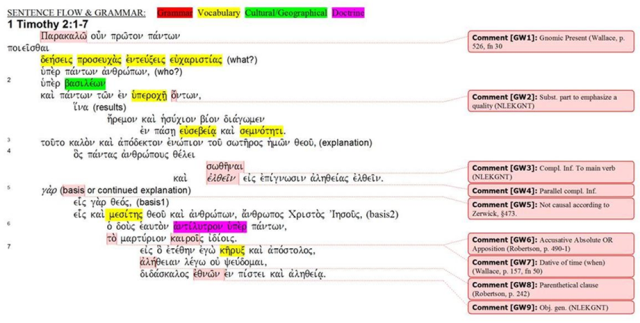
When I was taught to diagram, I was given a set very helpful instructions (which I cannot share, due to copyright restrictions). Though informative, I kept wishing I had this info in a consolidated single page. So, I created this cheat sheet:![]()
2016-04-19 Koine Greek Structural Diagramming Approach.pdf
Paradigms Matrix
This was pretty much my secret sauce, when it came to learning / memorizing verb paradigms. Until I created this, I was totally overwhelmed by all the memorization. The goal of this matrix is to learn the patterns associated with various forms. Once you know those, you can recreate each form. Now, at this point I have to emphasize that I am no Greek scholar. No doubt, those far more educated than I will be able to poke many holes in this matrix, explain the patterns much more effectively, or identify even more helpful tools. In no sense am I claiming that this is perfect, but it’s good enough to have helped me to master these paradigms when I needed to. If you want to help me improve it, I welcome the assistance. Until then, I hope it helps you as much as it did me.
Coming soon: I’ll add some instructions on how to use the matrix.![]()
2016-08-10 Koine Greek Verb Paradigm Matrix.pdf
Paradigm Details
Now that you have the patterns down, you need the details. Here are the full paradigms for key parts of speech. When possible, I centered on the verb λύω as a basic, simple, short verb, and inflected the daylights out of it.![]()
Finite Verbs: 2016-03-01 Koine Greek Finite Verb Paradigms.pdf
Non-Finite Verbs: 2016-03-01 Koine Greek Non-Finite Verb Paradigms.pdf
Articles, Nouns, Pronouns: 2016-03-01 Koine Greek Substantive Paradigms.pdf
Parsing Worksheet
A critical part of learning Greek is learning how to parse inflected forms of various parts of speech — identifying tense, voice, mood, person, case, number, gender, lexical form, and inflected meaning (as necessary) for nouns, verbs, adjectives, etc within the text. After a ton of manually drawing tables with which to practice parsing and on which to complete assignments, I finally created one to use repeatedly. Here it is:![]()
2016-03-01 Koine Greek Parsing Worksheet.pdf
![]() And here’s an example from 1 John of the worksheet filled in:
And here’s an example from 1 John of the worksheet filled in:
2016-04-20 Koine Greek Parsing Worksheet Example.pdf
Contract Verbs
Contract verbs sometimes make it a bit difficult to identify the form of speech of the verb. It’s very helpful to know the rules by which all the vowels — concluding the verb stem, connecting vowels, and various endings — “contract” or lengthen or are replaced. To help me keep it all straight, I created this grid:![]()
2016-03-01 Koine Greek Contract Verb Rules.pdf
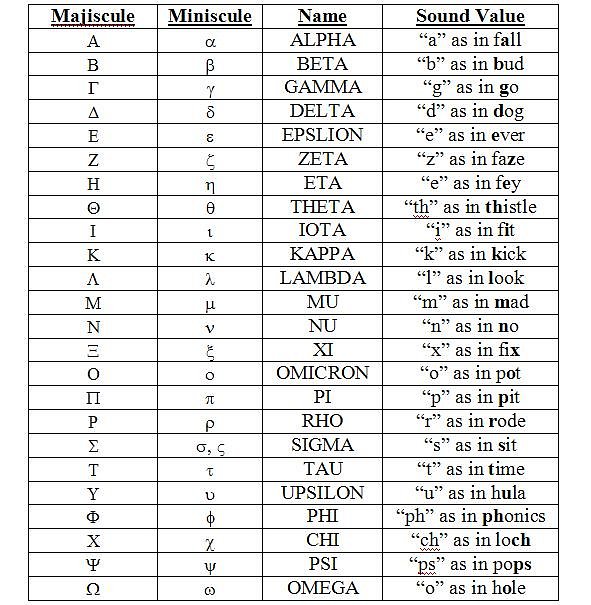
Alphabet Cheat Sheet
I found this early and used it a lot, especially for remembering the capitalized versions of letters (which I struggled with for some reason), and to hone my Erasmian pronunciation.
Flash Cards
I have found flash cards to be an invaluable tool for learning anything, especially language and vocabulary. I wish I had an authoritative recommendation / definitive solution for flash card software to offer. However, I’m still evaluating. I’ll offer my review of the top three I’ve discovered to-date, but each of them has pros and cons…
FlashFacts — www.flashfactsapp.com
I love FlashFacts. This is the system I’ve used for several years for all my flash card needs. Considering several options to-date, this is my current choice. I love the fact that it forces me to keep studying a deck until I have gotten every card right. That’s my favorite feature. It is also pretty robust from a template perspective — easily allowing for images, sounds, etc. On the downside, it starts to really suffer from delays loading decks that are too large, and I’ve run into real problems getting the mobile app to work with the decks I’ve created. Also, between its proprietary import-export format and the fact that nobody else seems to be aware of its existence, I have to do all the work myself to create cards.
Quizlet — www.quizlet.com
I know lots of people who love Quizlet, but I’m not a big fan. On the plus side, a ton of people have created and shared a ton of cards (which is easy to do), including for Greek and Hebrew studies. The system also incorporates a number of quizzing mechanisms and games, which is nice. However, on the negative side, it is designed for very concise matching of card content. This means that the testing mechanisms require you to type in one side or the other of each card precisely. So, for example, if you add 3 English glosses to a card for a Greek word, you’d have to enter the phrase containing all three of them precisely for Quizlet to think that you got the answer correct. This doesn’t work for me. Nor does the system force me to revisit cards I’ve gotten wrong in the same session, which is non-ideal.
Anki — ankisrs.net
Anki is new to me, so I can’t really recommend it. I’m just beginning to fiddle with it now. However, my engagement so far is good. It’s open-source, so customizable, and seems very powerful. Sometimes power costs ease-of-use, though, so we’ll see how it goes. Like Quizlet, it also seems to boast a large shared library of cards, and I’m already intrigued by some of its “make sure I learn this card before I move on” and “come back to this card regularly over time” kinds of features. So, I’ll label it “promising” for now, and get back to you.
Resource List
Books I use to assist me in Greek studies:
- The NA28 itself. Small print edition, and also the very helpful large print edition. I find for myself that it’s hard to distinguish breathing marks, sigla and other diacritical marks in the normal-sized print edition. BTW, be careful where you buy the large print edition. I saw it for a lot of different prices. When I bought it, the cheapest place I could find it (including S&H for ~$75) was on Christianbook.com.
- There is a very helpful walk-through of one page in the NA28 in David Trobisch’s helpful book, A User’s Guide to the NA28 (from which I have only read snippets) on pp12-14. Buy the book. Read just these 3 pages on Google Books.
- Next to the NA28 itself, one of the most valuable resources you can have for reading the GNT is Burer’s New Reader’s Lexicon. It lists all the “rare” words in the GNT (those appearing less than 50 times) in order by chapter and verse. It allows you to read the NA28 and quickly reference unknown vocabulary in flight. Very helpful.
- A primer on history of the language, as well as the alphabet, diphthongs, punctuation, and other useful tools at billmounce.com. Dr. Mounce has also written several useful books and even a mobile application to help students learn Greek. I own one of his books, but haven’t used it yet, and have not used the app. See billmounce.com.
- I very much appreciated Constantine Campbell’s book Keep Your Greek, 2010. It contained myriad helpful tips and tricks on how to maximize my effectiveness in learning the language.
- I recommend picking up the very helpful quick reference iOS application written by Sam Freney, which lists both Greek and Hebrew paradigms, parsing, and other helpful tools. It’s called Paradigmatic.
- Text critical sigla unicode hex values on the Evangelical Textual Criticism blog.

Hi Jeff, I am trying to download the Parsing Worksheet on this page but it times out. I get the message “This site can’t be reached. cdn.jeffblock.com took too long to respond” Can you help or email directly at gtealw@gmail.com. I appreciate your help.
LikeLiked by 1 person
Very sorry for the inconvenience. My CDN is down, and I haven’t invested in getting it back up and running, so many files like these are missing. I sent you the parsing sheets via email. Hope they are useful.
LikeLike