
Technical Resources for the Study of Biblical Hebrew
As I began my study of Biblical Hebrew, I quickly realized that would be even more need for study aids and special configuration of my Mac to support my study. I’m just beginning the process, but here are some helpful tips, tricks and tools I’ve learned to-date.
Using Hebrew on the Mac
The need to be able to type in Hebrew and easily switch back and forth between languages is paramount. I’ll try to come back to a PC-based setup, but for now, here’s what I’ve discovered to-date with my Mac. Hopefully, you’ll find these tips and tricks helpful.
(At the time of this writing, I’m using OS X El Capitan [v10.10].)
Add the Font: I use the fonts from the Society of Biblical Literature. There are three fonts out there: Greek, Hebrew, and a BibLit font, which attempts a hybrid font that “combines Greek, Hebrew, and Latin characters, including transliteration diacritics.” Use the following steps to install:
- Download the uncompressed font files for Hebrew and/or Greek (the BibLit font is in a compressed package that must be “unzipped”), and put it in a temporary location on your Mac
- Open your font book
- Add the two TTF files to your font book

- If you had a Word document (or equivalent) open trying to read this font prior to installing it, make sure you close Word entirely — on the Mac, it’s not enough to close and reopen the doc; you must close the whole app (⌘-Q, not ⌘-W)
- Re-open the document

Add the Hebrew Keyboard: To create my own Hebrew text on the Mac, you need a “keyboard” to do so. This is an internal piece of software, not a physical thing you type on. It configures your Mac so that when you strike a key on your physical keyboard, it displays a ג (Hebrew) or a δ (Greek), instead of a “d” (English).
But here you have a choice. The Mac comes with built-in “Hebrew QWERTY” and “Hebrew PC” options.
Option 1 (easy now, hard later): The Hebrew QWERTY keyboard lays out the keyboard in a pattern familiar to an English typer, so that the letter “a” on the keyboard generates the Hebrew “alef,” the “b” generates a “bet,” etc. This keyboard is easy to use immediately, but it is quite cumbersome once you start adding all the diacritical marks necessary to add vowels, shǝvas, accents, etc to your basic alphabet.
Option 2 (hard now, easy later): In contrast, the Hebrew PC keyboard lays out the keyboard as a modern Israeli person would experience their computer keyboard’s layout. It is totally different from the English keyboard, so the letter “a” on your English keyboard generates the Hebrew “sin” or “shin” (no diacritical mark), the “b” generates a “nun”, etc. And various layers — layer 2 is available while holding “shift”, layer 3 while holding “option”, etc — allow you to “decorate” your basic alphabet.
Option 3 (hard now, easy later, take 2): I started with the first of these (Hebrew QWERTY), but quickly decided to move to “the real thing”. However, I skipped the Hebrew PC keyboard included with MacOS, and instead downloaded the “Biblical Hebrew – Tiro” keyboard from SBL. They call the keyboards “drivers” (though “driver” is not technically accurate, but no matter). Download the installation files (published on this page). Uncompress this .DMG package, run it, and it should do all the work of installing for you.
The referenced SBL page also contains are a set of manuals explaining in gory detail how these keyboards and fonts work. I don’t think you’ll really need to read it all, but what you definitely do need is pp6-9 of the SBL Hebrew Tiro Keyboard Driver Manual, which shows you the four layers of the Hebrew keyboard. They’re beautifully laid-out as full-sized landscape pages to print and tack on the wall by your workstation. No better way to learn this keyboard (in my opinion) than to do just that, and keep fighting through it.

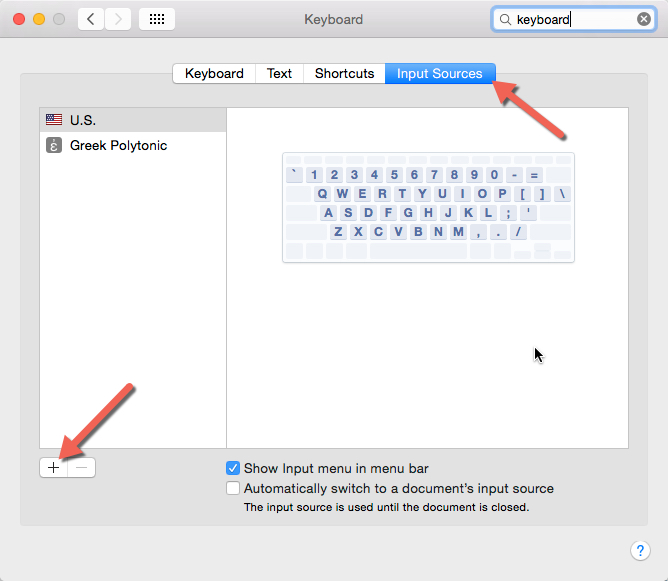
BUT, in case you would prefer to use the QWERTY version, here’s how to add the “Hebrew QWERTY” input source from keyboard settings…
First, add the input source:

Switching between Keyboards
Once the input source is added, you will see it in the menu bar…

And you can setup a shortcut (also in keyboard settings; see the image to the right above; select the “Shortcuts” tab — which allows you to switch quickly back and forth between your native keyboard and your new Hebrew Keyboard, using a hotkey. I set mine to ⌘-[ (to scroll left) and ⌘-] (to scroll right) between the options. Note that if you select something that already exists as a hot-key, you’ll have to remove that hot-key from the old shortcut. Obviously, any given key combination can only link to one thing.
